Bottle Plotter
Bottle Plotter
I have noticed that, it is quite common in group of small wine producers, that they don't use bottle labels. Usually they just draw some basic info on the bottle with special (Edding) paint marker. That is how I got this idea. Everybody can get paper label printed, but what about bottle plotter. CNC that would used paint marker as plotter to plot the label directly on the bottle. And with tool-changer you could also have more colors.
I had this idea in my head for some time, but it take me quite long time to do this mental kick-off and start to work on it. Usually, what works for me is that when the mood is right I go outside walking and fully put myself in this trans-like state where I keep iterating on that idea and create first design in my head. But the "mood" was not coming for some time, so once I have found myself forced to drive for 2h alone in car back home. I never tried this while driving, but I have managed to get myself into that state and come with first design. I also decided I would like to prototype it as fast as possible.
The plan was to create any shitty design first, print it, test it, change it, print it again. It was kind of amazing, funny but also exhausting. On beginning I started simply on the whole mechanical configuration of the plotter. Main ideas for before I started.
- I will putt stepper motor on free moving arm with rubber wheel touching the bottle on top and with its weight it will press on the bottle to assure contact and when running it will rotate the bottle.
- Pen will be placed horizontally
- There will be quite sophisticated revolver mechanism for changing pens
- Bottle will be rolling on bearing on the bottom that will be done in way it could accommodate different diameters of bottles
- I will make the final product as simple/cheap as possible. Maximum of 3D printing and as few types of mechanical components as possible. I decided to use M4x10 with cylindrical head as standard fastener.
Spoiler: All / Most of this proved to be wrong.
After putting first parts together issues started to show up. Having motor on top did not work, it was trying to push the bottle but not roll it every time. I decided to abandon multi-tool quite soon as it started to be obvious it is just big complication for now and sign of feature creep. And should be pushed to the future as "Nice to have".
First prototype was just awful, ugly falling apart. I was usually designing and printing about 4 revision of some part per day. But I was learning a lot. I used some parts that I already had on hand as linear stage etc. so this defined some aspects of the design.
For electronics I have decided to use the cheapest thing available. Arduino CNC shield and GRBL, it is not great but it is cheap and should be enough. I spent quite some time with debugging interference issues between limit switches and motors. Which I think is price for this cheap electronics.

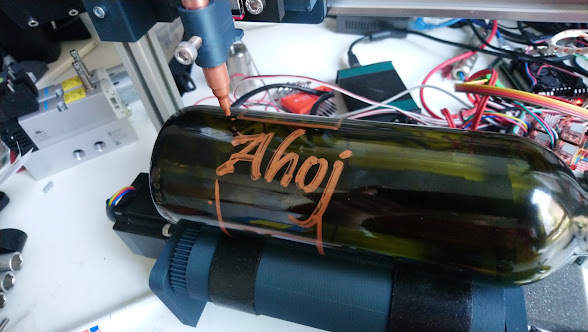
On the picture, there is already little bit advanced version on which I started testing motorized roller on bottom. But this also did not work well. One of the issue was that, as the bottle is not perfect you may end up on different spot when you are rotating back and forward. Also one the issues is that you need some freedom of movement on the pen to allow for following surface of bottle. So everything points to having the pen vertical. In hindsight it seems sooooo obvious.

I tried to used printed spring for the pen holder but it was not working well so I went with linear rail that I had at hand. I wanted to use just gravity for pushing the pen but ended up with spring after all.

Ended up with pretty cool, refined pen holder system


And yes, using axial direct drives solves lot of issues and it is simpler. One disadvantage is that the motor has lower resolution as there are not any gears or lead screw to make its step finer. But that should not be an issue.

Couple of iteration later on locking mechanism. Simple and mostly printed.

After all of this I actually had decent CNC bottle plotter. But it was still based on proprietary components (motors, stage, linear rails) that I had by accident lying around, so in case I would like to build another one, I could not.
Version 2
Lot of time passed before V2. This project was something I did for my own education and for fun. So that means in free time. And as I started to build Positron V3, then design some parts and upgrades for it. This endeavor ended up as our Muon3D.com project. I really did not have muc time to focus on this. But luckily I was approached by my first customer who offered couple bottles of wine in exchange for working bottle plotter.
When I started to work on first version I was not using any master model or assembly of whole project. All was done on my table, which was helpful as I did not have really that many experience to be sure how I want to really design it. But for V2 I decided to build 3D assembly before printing and building.
Key ideas for V2:
- Use only as much standard as possible components. Which means cheap and easy to get.
- Simplify the design even more.
- Use 3D designed master model
- Make it as cheap as possible
As I was little bit skeptic about having whole assembly model on begging, as I saw it as too much extra work without much of benefit. I had to say it definitely saved me lot time and iterations after all. And it was worth it.

3D model

Behold! The plotter itself

And plotted bottle. Graphic on the bottle is downloaded from plotterfiles.com
Software
One of common questions from people. How do I actually prepare data for plotting on circular surface and funny enough, you don't need to do anything. All the machine acts as the bottle is flat surface and it rotates around its axis. So any SW that can generate data for 2D plotter should work.
The common SW workflow is that you take vector image, best is SVG. Then Convert it to G-Code that is than played from PC over USB to GRBL motor driver. I had issues with finding something that I would be happy with so after all I decided to slicer/CAM on my own. It is simple web pages where you upload svg and the get g-code file after some processing. Stack is pure JS with some JQ. There is still need for improvements, but it works and it is kind of fun to work on it.

Plans
There are still some issue with the X axis as the motor misbehaves which I think is due to cheap drivers and board. So I would like to test new electronics that would be better but not that much more expensive.
There is still space for some design optimization to remove some parts and make it cheaper and simplify it.
I started the design in Inventor but then I switched to OnShape as it is (at least for now) free. So I would like to redesign all components in OnShape so it is easier to do any future changes.
Also I would like to open source whole design and start selling kits for people interested.
More info can be found on BottlePlotter.CZ
Conclusion
I'm happy I managed to test both, rapid iteration and more controlled way of building stuff. Again looking on the final machine everything looks as very obvious solution. Which is annoying as it took me quite some time to get to that. But it is also sign that it is probably the right one. I was also able to get the component price for everything for around 150$ without printed parts, which I'm quite happy about.
PS: I'm looking someone to help me open source it.
"I'm looking someone to help me open source it." - what support or help do you need here? I'm interested!
OdpovědětVymazat